iptables详解--转(3)
|
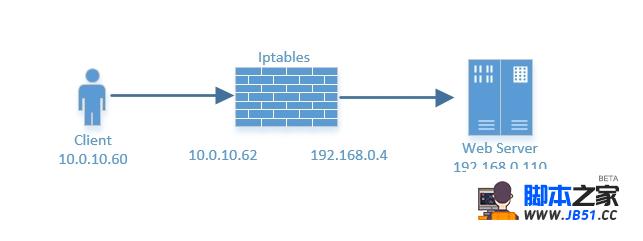
在iptalbes中数据包和被跟踪连接的4种不同状态相关联,这四种状态分别是NEW、ESTABLISHED、RELATED及INVALID,除了本机产生的数据包由NAT表的OUTPUT链处理外,所有连接跟踪都是在NAT表的PREROUTING链中进行处理的,也就是说iptables在NAT表的PREROUTING链里从新计算所有数据包的状态。如果发送一个流的初始化数据包,状态就会在NAT表的OUTPUT链里被设置为NEW,当收到回应的数据包时,状态就会在NAT表的PREROUTING链里被设置为ESTABLISHED,如果第一个数据包不是本机生成的,那就回在NAT表PREROUTING链里被设置为NEW状态,所以所有状态的改变和计算都是在NAT表中的表链和OUTPUT链里完成的。 使用-m来指定其状态并赋予匹配规则,语法如下 -mstate --state?状态 ? ?NEW ? ?ESTABLISHED ? ?RELATED ? ? ? ? ? ? ?INVALID NEW: NEW状态的数据包说明这个数据包是收到的第一个数据包。比如收到一个SYN数据包,它是连接的第一个数据包,就会匹配NEW状态。第一个包也可能不是SYN包,但它仍会被认为是NEW状态。 ESTABLISHED: 只要发送并接到应答,一个数据连接就从NEW变为ESTABLISHED,而且该状态会继续匹配这个连接后继数据包。 RELATED: 当一个连接和某个已处于ESTABLISHED状态的连接有关系时,就被认为是RELATED,也就是说,一个连接想要是RELATED的,首先要有个ESTABLISHED的连接,这个ESTABLISHED连接再产生一个主连接之外的连接,这个新的连接就是RELATED。 INVALID: INVALID状态说明数据包不能被识别属于哪个连接或没有任何状态。 例: 对本机22端口做状态监测: 进来的请求状态为new,而出去的状态则为ESTABLISHED,如果自动连接别人 状态肯定为NEW,如果正常去响应别人那么状态肯定是ESTABLISHED [root@test3~]# iptables -I INPUT -s 10.0.10.0/24 -d 10.0.10.62 -p tcp --dport 22 -m state--state NEW,ESTABLISHED -j ACCEPT 出口的响应都必须是ESTABLISHED [root@test3~]# iptables -A OUTPUT -s 10.0.10.62 -d 10.0.10.0/24 -p tcp --dport 22 -m state--state ESTABLISHED -j ACCEPT [root@test3~]# iptables -L -n ChainINPUT (policy ACCEPT) target ? ? prot opt source ? ? ? ? ? ? ? destination ? ? ? ? ACCEPT ? ? tcp -- ?10.0.10.0/24 ? ? ? ? 10.0.10.62 ? ? ? ? ?tcp dpt:22 state NEW,ESTABLISHED ChainFORWARD (policy DROP) target ? ? prot opt source ? ? ? ? ? ? ? destination ? ? ? ? ChainOUTPUT (policy ACCEPT) target ? ? prot opt source ? ? ? ? ? ? ? destination ? ? ? ? ACCEPT ? ? tcp ?-- 10.0.10.62 ? ? ? ? ?10.0.10.0/24 ? ? ? ?tcp dpt:22state ESTABLISHED 多端口规则匹配 使用参数-m multiport 可以指定15个以内的非连续端口,比如21-22,80 -mmulitport ? ? ?--src-prots ? ?--dst-ports ? ?--prots #对多端口进行匹配,只要匹配以下端口,则全部放行 [root@test3~]# iptables -A INPUT ?-s 10.0.10.0/24 -d10.0.10.62 -p tcp -m state --state NEW ?-m mulitport--destination-ports 21,22,80 -j ACCEPT 多IP匹配,指定匹配的IP地址范围: -miprange ? ?--src-range ? ?--dst-range 指定匹配的连续ip段 [root@test3~]# iptables -A INPUT -s ?-m iprange --src-range 10.0.10.100-10.0.10.200 指定速率匹配 默认为每秒匹配3个报文,基于令牌桶算法 -mlimit ? ?--limit ? ? ? ? ? ? #NUMBER,表示允许收集多少个空闲令牌 ? ?--limit-burst ? ? ? ? ?#RATE,允许放行多少个报文 比如:ssh一分钟之内只能建立20个链接,平均5秒一个,而一次性只能放行2个空闲令牌 ? ?--limit 20/min ? ?--limit-burst 2 只有在大量空闲令牌存储的情况下,才可有limit-burst控制 例:控制NEW状态的请求 [root@test3~]# iptables -A INPUT -s 10.0.10.0/24 -d 10.0.10.62 -m state --state NEW -mlimit --limit 12/min --limit 12/min --limit-burst 2 -j ACCEPT 例2:每次只允许2个ping包进来 [root@test3~]# iptables -F [root@test3~]# iptables -A INPUT -s 10.0.10.0/24 -d 10.0.10.62 -p icmp --icmp-type 8 -mlimit --limit 20/min --limit-burst 5 -j ACCEPT 新建立一终端,在其终端ping10.0.10.62可以看到效果,不再演示 2.5对应用层进行匹配 对应用层编码字符串做相似匹配,常用算法使用--alog来指定 ,一般来讲算法一般为bm和kmp -msrting ? ? ?--string "" ? ?--algo {bm|kmp} 例: ・假如我们期望web站点页面中任何包含"hello"的字符串的页面,则禁止访问,其他则放行 ・请求报文中不会包含hello,一般来讲只包含访问某个页面,那么请求内容无非包含了请求某个链接而已 ・响应报文中会封装页面的内容信息,因此 会出现在响应报文中,而不是请求报文 启动httpd服务 [root@test3~]# /etc/init.d/httpd start 在web站点新建页面1.html,内容为"hello" , 2.html内容为"word" [root@test3domian]# echo hello > 1.html [root@test3domian]# echo word > 2.html 在iptables的允许放行规则前面加一条更严谨的禁止规则: [root@test3domian]# iptables -A OUTPUT -s 10.0.10.62 -p tcp --sport 80 -m string --string"hello" --algo kmp -j REJECT 再次访问 [root@test3domian]# curl -dump http://10.0.10.62/2.html word [root@test3domian]# curl -dump http://10.0.10.62/1html #请求已发出去但是一直没有反应,我们来看一下防火墙规则是否被匹配到 [root@test3domian]# iptables -L -nv ChainINPUT (policy ACCEPT 255 packets,30024 bytes) pkts bytes target ? ? prot opt in ? ? out ? ?source ? ? ? ? ? ? ? destination ? ? ? ? ChainFORWARD (policy DROP 0 packets,0 bytes) pkts bytes target ? ? prot opt in ? ? out ? ?source ? ? ? ? ? ? ?destination ? ? ? ? ChainOUTPUT (policy ACCEPT 201 packets,29406 bytes) pkts bytes target ? ? prot opt in ? ? out ? ?source ? ? ? ? ? ? ?destination ? ? ? ? ? 35 11209 REJECT ? ? tcp -- ?* ? ? ?* ? ? ?10.0.10.62 ? ? ? ? ?0.0.0.0/0 ? ? ? ? ? tcp spt:80STRING match "hello" ALGO name kmp TO 65535 reject-withicmp-port-unreachable 基于时间限定 -m time #指定日期起止范围 ? ?--datestart ? ?--datestop #指定时间的起止范围 ? ?--timestart ? ?--timestop #指定星期x范围 ? ?--weekdays #指定月份 ? ?--monthdays 3.基于iptables实现NAT功能 3.1基于SNAT功能的实现 考虑场景:为解决IP地址不足,所以用NAT功能来实现成本节约 SNAT:源地址转换(代理内部客户端访问外部网络)在POSTROUTING或OUTPUT链上来做规则限制 参数选项: ? ? -j SNAT --to-source IP ? ? -j MASQUERADE DNAT?:目标地址转换(将内部服务器公开至外部网络)需在PREROUTING做限制 参数选项: ? ?-j DNAT --to-destination IP:prot NAT不但可以转换目标地址,还可以映射目标端口 拓补图如下:
假设iptables为网关服务器,192.168.0.0为内网地址段 10.0.10.0 为外网地址段 规划: 相关内容
网友评论
推荐文章
热点阅读
【免责声明】本站内容转载自互联网,其发布内容言论不代表本站观点,如果其链接、内容的侵犯您的权益,烦请提交相关链接至邮箱nqiang002@foxmail.com我们将及时予以处理。 建议您使用1366×768 分辨率、Microsoft Internet Explorer 11浏览器以获得本站的出色浏览效果 Copygight © 2008-2023 http://www.aspzz.cn All Rights Reserved. ASP站长网 站长:nqiang002#foxmail.com(请把#换成@)
|
 Debian、Ubuntu、Linu
 CentOS搭建V~P~N服务